Unix Tutorial Projects: Compiling Brave browser on Linux Mint
 Brave browser
Some of you may have noticed: I added the link to Brave browser to the sidebar here on Unix Tutorial. That’s because I’m giving this new browser a try and support its vision to reward content producers via Brave’s Basic Attention Token cryptocurrency. If you aren’t using Brave browser already, download and try Brave browser using my link.
In this Unix Tutorial Project, just because it seems fun and educational enough, I’ll attempt compiling Brave browser on my Dell XPS 13 laptop running Linux Mint 19. There’s a much easier way to install Brave browser from official repositories: official instructions here.
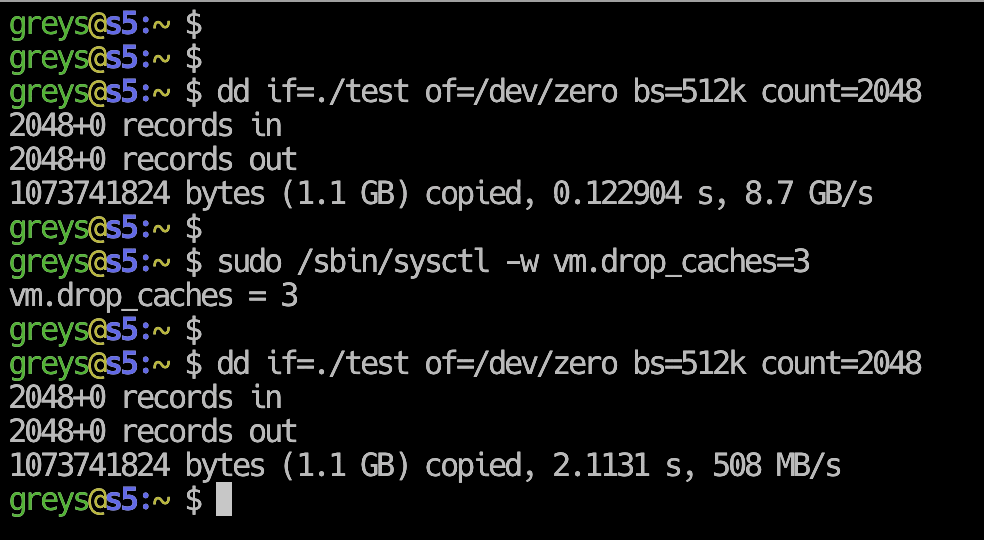
Make sure you have enough disk space
This project suprised me a bit. I had 20GB of space and thought it would be enough! Then I saw the git download alone would be almost 15GB, but hoped I had enough.
I was wrong! Ended up resizing Windows 10 partition on my laptop to free up space for another 100GB Linux filesystem.
The final space consumption is 67GB, that’s a lot of source code with an impressive amount (32 thousand of them!) object files (intermidiary binary files you need when compiling large project. they’re used to make up the final binary:
root@xps:/storage/proj# du -sh brave-browser
67G brave-browser
Prepare Linux Mint 19 for Compiling Brave Browser
Following instructions from https://github.com/brave/brave-browser/wiki/Linux-Development-Environment, I first installed the packages:
greys@xps:~$ sudo apt-get install build-essential libgnome-keyring-dev python-setuptools npm
[sudo] password for greys:
Reading package lists... Done
Building dependency tree
Reading state information... Done
build-essential is already the newest version (12.4ubuntu1).
The following package was automatically installed and is no longer required:
libssh-4
Use 'sudo apt autoremove' to remove it.
The following additional packages will be installed:
gir1.2-gnomekeyring-1.0 gyp libc-ares2 libgnome-keyring-common libgnome-keyring0 libhttp-parser2.7.1 libjs-async libjs-inherits libjs-node-uuid libjs-underscore
libssl1.0-dev libssl1.0.0 libuv1-dev node-abbrev node-ansi node-ansi-color-table node-archy node-async node-balanced-match node-block-stream node-brace-expansion
node-builtin-modules node-combined-stream node-concat-map node-cookie-jar node-delayed-stream node-forever-agent node-form-data node-fs.realpath node-fstream
node-fstream-ignore node-github-url-from-git node-glob node-graceful-fs node-gyp node-hosted-git-info node-inflight node-inherits node-ini node-is-builtin-module node-isexe
node-json-stringify-safe node-lockfile node-lru-cache node-mime node-minimatch node-mkdirp node-mute-stream node-node-uuid node-nopt node-normalize-package-data node-npmlog
node-once node-osenv node-path-is-absolute node-pseudomap node-qs node-read node-read-package-json node-request node-retry node-rimraf node-semver node-sha node-slide
node-spdx-correct node-spdx-expression-parse node-spdx-license-ids node-tar node-tunnel-agent node-underscore node-validate-npm-package-license node-which node-wrappy
node-yallist nodejs nodejs-dev python-pkg-resources
Suggested packages:
node-hawk node-aws-sign node-oauth-sign node-http-signature debhelper python-setuptools-doc
Recommended packages:
javascript-common libjs-jquery nodejs-doc
The following packages will be REMOVED:
libssh-dev libssl-dev
The following NEW packages will be installed:
gir1.2-gnomekeyring-1.0 gyp libc-ares2 libgnome-keyring-common libgnome-keyring-dev libgnome-keyring0 libhttp-parser2.7.1 libjs-async libjs-inherits libjs-node-uuid
libjs-underscore libssl1.0-dev libuv1-dev node-abbrev node-ansi node-ansi-color-table node-archy node-async node-balanced-match node-block-stream node-brace-expansion
node-builtin-modules node-combined-stream node-concat-map node-cookie-jar node-delayed-stream node-forever-agent node-form-data node-fs.realpath node-fstream
node-fstream-ignore node-github-url-from-git node-glob node-graceful-fs node-gyp node-hosted-git-info node-inflight node-inherits node-ini node-is-builtin-module node-isexe
node-json-stringify-safe node-lockfile node-lru-cache node-mime node-minimatch node-mkdirp node-mute-stream node-node-uuid node-nopt node-normalize-package-data node-npmlog
node-once node-osenv node-path-is-absolute node-pseudomap node-qs node-read node-read-package-json node-request node-retry node-rimraf node-semver node-sha node-slide
node-spdx-correct node-spdx-expression-parse node-spdx-license-ids node-tar node-tunnel-agent node-underscore node-validate-npm-package-license node-which node-wrappy
node-yallist nodejs nodejs-dev npm python-pkg-resources python-setuptools
The following packages will be upgraded:
libssl1.0.0
1 upgraded, 80 newly installed, 2 to remove and 286 not upgraded.
Need to get 10.7 MB of archives.
After this operation, 37.7 MB of additional disk space will be used.
Do you want to continue? [Y/n] y
Get:1 http://archive.ubuntu.com/ubuntu bionic/universe amd64 libgnome-keyring-common all 3.12.0-1build1 [5,792 B]
Get:2 http://archive.ubuntu.com/ubuntu bionic/universe amd64 libgnome-keyring0 amd64 3.12.0-1build1 [56.1 kB]
...
Get:81 http://archive.ubuntu.com/ubuntu bionic/universe amd64 npm all 3.5.2-0ubuntu4 [1,586 kB]
Fetched 10.7 MB in 2s (6,278 kB/s)
Extracting templates from packages: 100%
Preconfiguring packages ...
(Reading database ... 267928 files and directories currently installed.)
...
You should end up with a whole bunch of npm (node-*) packages installed.
You need to install gperf package as well – npm run build (last step below) failed for me because gperf wasn’t found.
greys@xps:~$ sudo apt-get install gperfClone Brave Browser git Repo
We’re now ready to clone the repo:
greys@xps:~/proj$ git clone [email protected]:brave/brave-browser.git
Cloning into 'brave-browser'...
Enter passphrase for key '/home/greys/.ssh/id_rsa':
remote: Enumerating objects: 43, done.
remote: Counting objects: 100% (43/43), done.
remote: Compressing objects: 100% (36/36), done.
remote: Total 6466 (delta 27), reused 17 (delta 7), pack-reused 6423
Receiving objects: 100% (6466/6466), 1.28 MiB | 833.00 KiB/s, done.
Resolving deltas: 100% (4425/4425), done.
and then do npm install. This is how it should look:
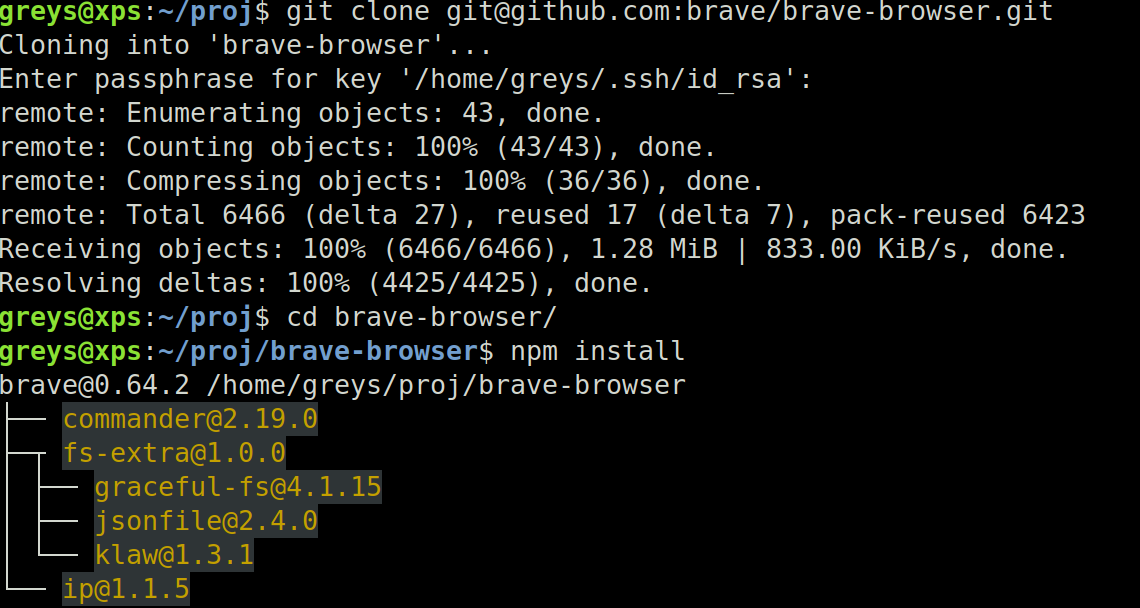 git cloning Brave browser
Download Chromium source code using npm
npm run init command will download the source code of Chromium browser (open source original Chrome is being built on), Brave browser is based on it. This should take a while – on my 100Mbit connection it took 25min to download 13.5GB (that’s comporessed, mind you!) of Chromium’s source code and then another 25min to download the rest of dependencies:
greys@xps:~/proj/brave-browser$ npm run init

> [email protected] init /home/greys/proj/brave-browser
> node ./scripts/sync.js --init

git submodule sync
git submodule update --init --recursive
Submodule 'vendor/depot_tools' (https://chromium.googlesource.com/chromium/tools/depot_tools.git) registered for path 'vendor/depot_tools'
Submodule 'vendor/jinja' (git://github.com/pallets/jinja.git) registered for path 'vendor/jinja'
Cloning into '/home/greys/proj/brave-browser/vendor/depot_tools'...
Cloning into '/home/greys/proj/brave-browser/vendor/jinja'...
Submodule path 'vendor/depot_tools': checked out 'eb2767b2eb245bb54b1738ebb7bf4655ba390b44'
Submodule path 'vendor/jinja': checked out '209fd39b2750400d51bf571740fe5ba23008c20e'
git -C /home/greys/proj/brave-browser/vendor/depot_tools clean -fxd
git -C /home/greys/proj/brave-browser/vendor/depot_tools reset --hard HEAD
HEAD is now at eb2767b2 Roll recipe dependencies (trivial).
gclient sync --force --nohooks --with_branch_heads --with_tags --upstream
WARNING: Your metrics.cfg file was invalid or nonexistent. A new one will be created.

**\_\_\_\_** running 'git -c core.deltaBaseCacheLimit=2g clone --no-checkout --progress https://chromium.googlesource.com/chromium/src.git /home/greys/proj/brave-browser/\_gclient_src_JunGAS' in '/home/greys/proj/brave-browser'
Cloning into '/home/greys/proj/brave-browser/\_gclient_src_JunGAS'...
remote: Sending approximately 14.36 GiB ...
remote: Counting objects: 161914, done
remote: Finding sources: 100% (949/949)
Receiving objects: 3% (362855/12095159), 163.33 MiB | 10.38 MiB/s
[0:01:00] Still working on:
[0:01:00] src
Receiving objects: 5% (632347/12095159), 267.23 MiB | 9.94 MiB/s
[0:01:10] Still working on:
[0:01:10] src
...
├─┬ [email protected]
│ ├── [email protected]
│ ├─┬ [email protected]
│ │ └── [email protected]
│ ├── [email protected]
│ ├── [email protected]
│ ├── [email protected]
│ ├─┬ [email protected]
│ │ ├─┬ [email protected]
│ │ │ └── [email protected]
│ │ └─┬ [email protected]
│ │ ├─┬ [email protected]
│ │ │ ├── [email protected]
│ │ │ └─┬ [email protected]
│ │ │ └── [email protected]
│ │ └── [email protected]
│ └── [email protected]
└── [email protected]

npm WARN [email protected] requires a peer of ajv@^5.0.0 but none was installed.
npm run build

> [email protected] build /home/greys/proj/brave-browser/src/brave/components/brave_sync/extension/brave-crypto
> browserify ./index.js -o browser/crypto.js

Hook '/usr/bin/python src/brave/script/build-simple-js-bundle.py --repo_dir_path src/brave/components/brave_sync/extension/brave-crypto' took 27.09 secs
Running hooks: 100% (83/83), done.
Build Brave Browser from Source Code
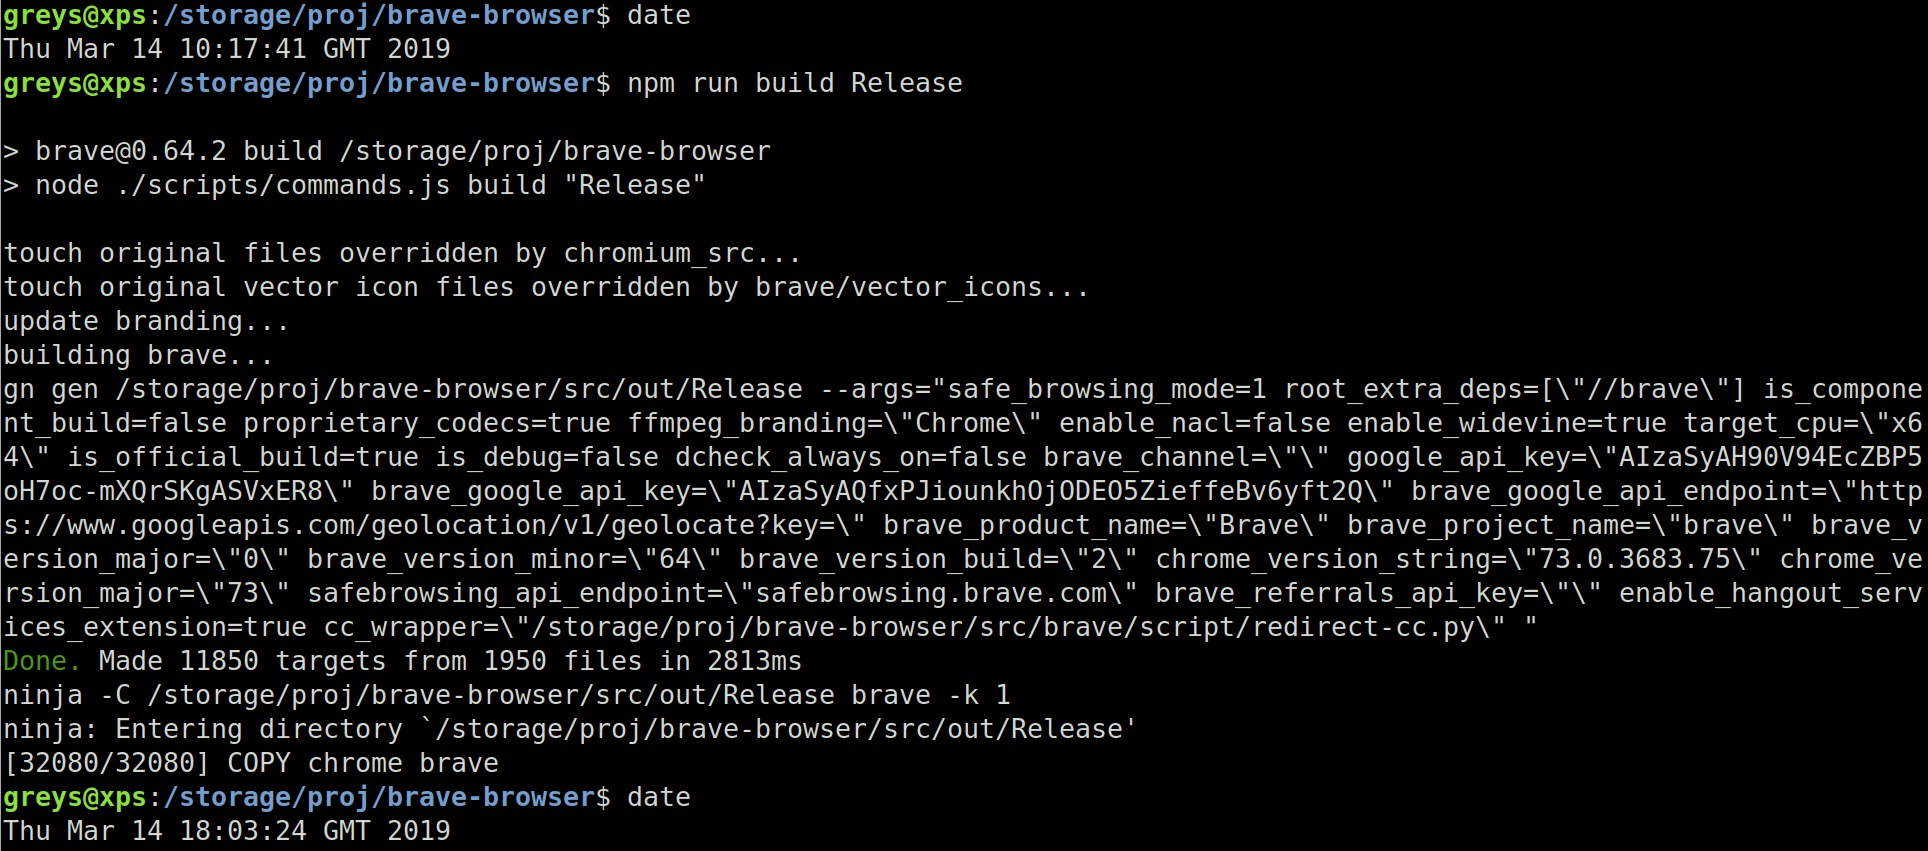
Here we go! Let’s build this thing. Should take an hour or two on a fast PC:
greys@xps:~/proj/brave-browser$ npm run build ReleaseThis is a release build, meaning this is a fully performance and release-grade build of the source code. If you’re going to contribute to Brave browser open source project, you should know that npm run build (without Release parameter) will provide a debug build.
This is how the end process looks (took a few hours to compile on the 8-core CPU of my XPS laptop):
 Brave browser fully compiled
Start the Newly built Brave Browser
This is it! Let’s try starting the browser, this should complete our Unix Tutorial project today:
 Brave browser
And an about page, just for the history:
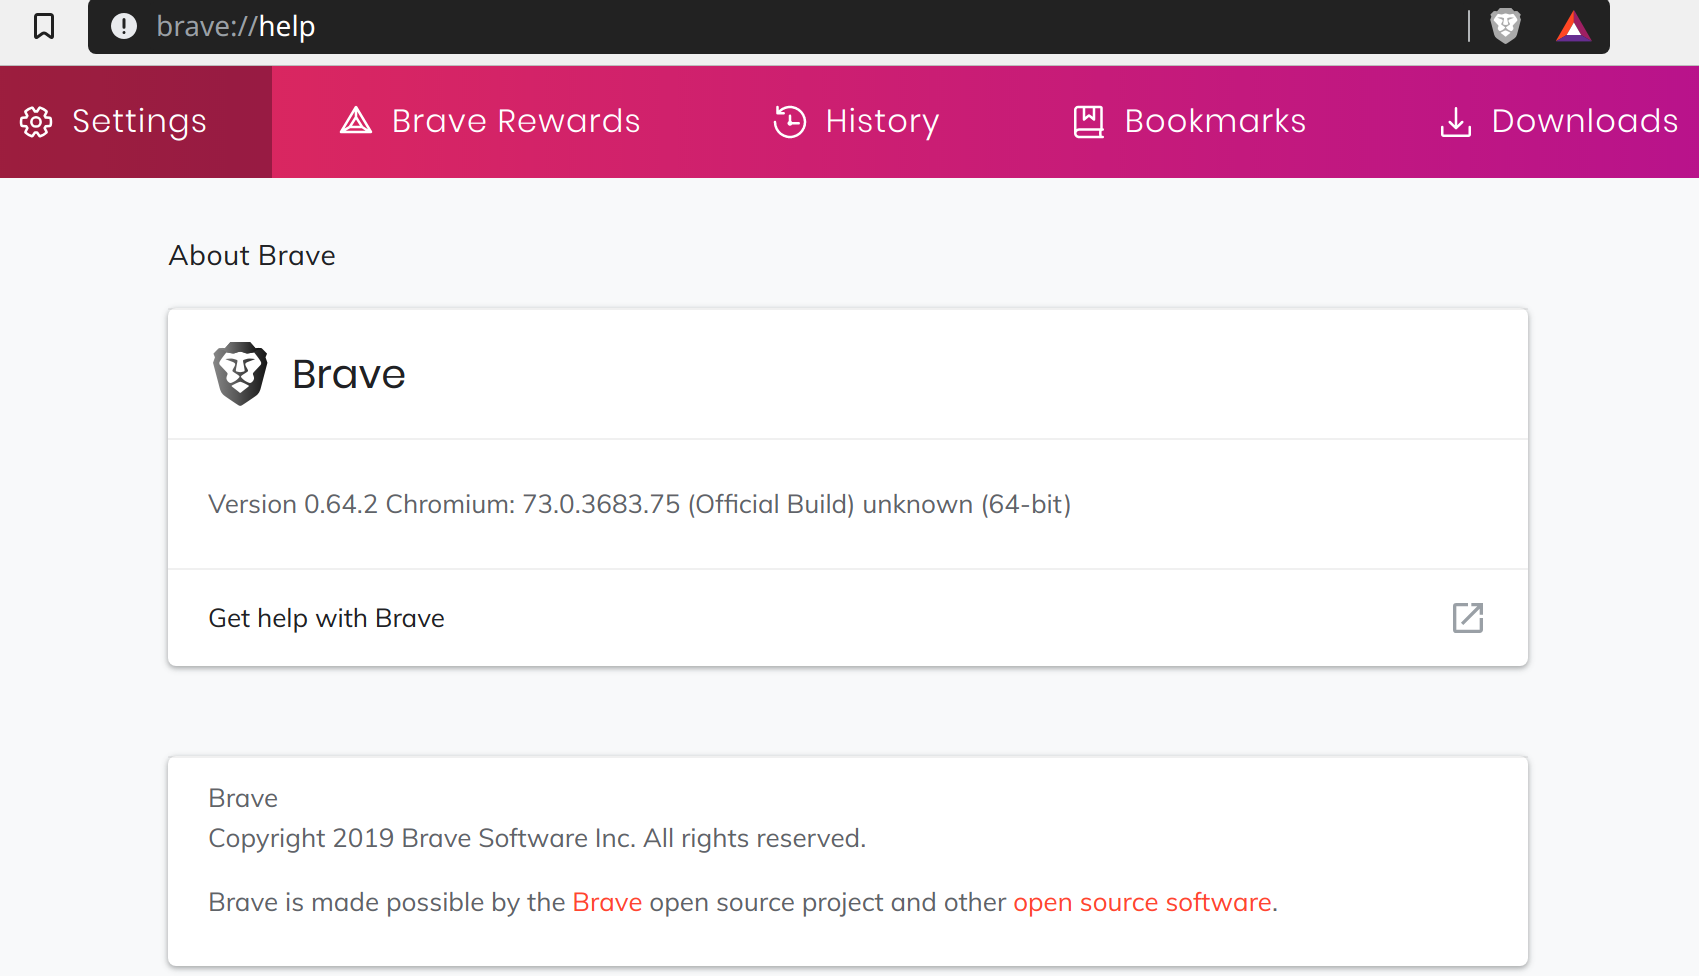 About page in Brave browser
That’s it for today!