Project: Password Protect a Website with nginx

I needed to keep a few older websites online for a short little while, but didn’t want to leave them wide open in case older CMS systems were vulnerable – so I decided to protect them with password.
What is nginx?
nginx (pronounced Engine-Ex) is a webserver, reverse-proxy and caching solution powering a massive portion of the Internet websites today. It’s a lightweight web-server with non-locking implementation, meaning it can server impressive amounts of traffic with humble resource requirements.
nginx was acquired by F5 in 2019.
I’ll be writing a lot more about nginx in 2020, simply because I’m finally catching up with my dedicated hosts infrastructure and will be getting the time to document my setup and best practices.
Password Protecting in nginx
There’s a few steps to protecting a website using nginx (steps are similar but implemented differently in Apache web server):
Decide and create/update the passwords file Decide on the username and password Generate password hash and add entry to the passwords file Update webserver configuration to specify password protection Because websites are configured as directory locations, you have a choice of protecting the whole website like www.unixtutorial.org or just a part (subdirectory) of it, like www.unixtutorial.org/images.
INTERESTING: even though it’s commonly referred to as password protecting websites, what actually happens is you protect with username and password. So when you’re trying to open a protected website, you get a prompt like this, right there in your browser:
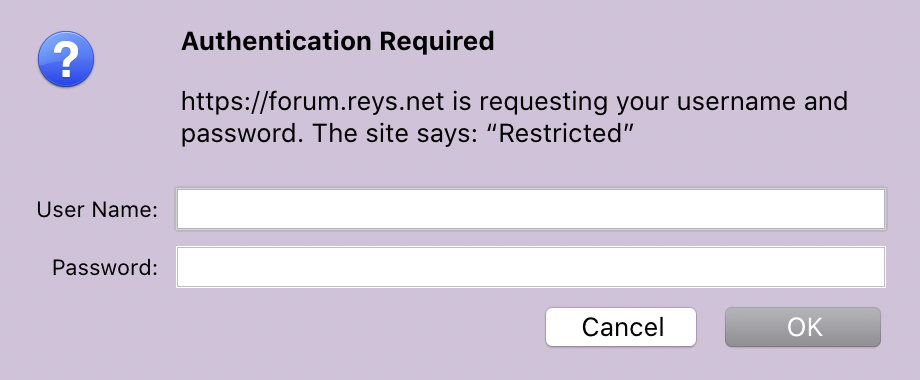 nginx password protection prompt
Password file and username/password Configuration
Most of the time website access is controlled by files named htpasswd. You either create default password file in /etc/nginx/htpasswd location, or create a website specific version like /etc/nginx/unixtutorial.htpasswd.
You can create a file using touch command:
# touch /etc/nginx/unixtutorial.htpasswdOr better yet, use the htpasswd command to do it. But because htpasswd is part of Apache tools, you may have to install it first:
$ sudo yum install httpd-toolsWhen you run the htpasswd command, you specify two parameters: the password file name and the username you’ll use for access.
If the password file is missing, you’ll be notified like this:
$ sudo htpasswd /etc/nginx/htpasswd unixtutorial
htpasswd: cannot modify file /etc/nginx/htpasswd; use '-c' to create it.
And yes, adding the -c option will get the file created:
$ sudo htpasswd -c /etc/nginx/htpasswd unixtutorial
 New password:
 Re-type new password:
 Adding password for user unixtutorial
Now, if we cat the file, it will show the unixtutorial user and the password hash for it:
$ cat /etc/nginx/htpasswd
unixtutorial:$apr1$bExTryjsplfo/$uxRop/uv5XvWlsej4EM5gv0IMPORTANT: although this file doesn’t contain actual passwords, only their encrypted hashes, it can still be used to guess your passwords on powerful systems – so take the usual measures to protect access to this file.
Update Website Configuration with Password Protection I’ve got the following setup for this old website in my example:
server {
     listen      *:80;
     server_name forum.reys.net;
     keepalive_timeout    60;

     access_log /var/log/nginx/forum.reys.net/access.log multi_vhost;
     error_log /var/log/nginx/forum.reys.net/error.log;

location / {
     include "/etc/nginx/includes/gzip.conf";
     proxy_pass  http://172.31.31.47:80;

     include "/etc/nginx/includes/proxy.conf";
     include "/etc/nginx/includes/headers.conf";
     }
}
Protection is done on the location level. In this example, location / means my whole website is protected.
So right in front of the proxy_pass entry, I’ll add my password protection part:
auth_basic "Restricted";
auth_basic_user_file /etc/nginx/htpasswd;
As you can see, we’re referring to the password file that we created earlier. The auth_basic “Restricted” part helps you to configure a specific message (instead of word Restricted) that will be shown during username/password prompt.
That’s how the password protected part will look:
location / {
     include "/etc/nginx/includes/gzip.conf";
     proxy_pass  http://172.31.31.47:80;

     auth_basic "Restricted";
     auth_basic_user_file /etc/nginx/htpasswd;

     include "/etc/nginx/includes/proxy.conf";
     include "/etc/nginx/includes/headers.conf";
     }
Save the file and restart nginx:
$ sudo service restart nginxNow the website https://forum.reys.net is password protected!
See Also
- nginx
- Unix Tutorial Projects
- Install Ubuntu on Dell XPS laptop
- Project: NAS storage with Helios 4