Raspberry Pi 4
Wow, Raspberry Pi 4 is now available with 8GB of DDR4 memory! This is still a crazy good value for something that costs less than $100 ($75 for just the Raspberry Pi itself, actually) and runs modern operating systems with most of functionality you come to expect from a Linux desktop!
I needed to forward X11 output from one of my Linux servers recently to run virt-manager (manager for virtual machines in KVM), and because it’s been a while I had to download and install X11 server again.
I love reading man pages for even the most basic Unix commands like ls, because there’s always something interesting to learn. Today I discovered that it’s possible to sort ls output by file size.
As I mentioned, I’m building a new Linux based desktop PC – currently running RHEL 8. Since I’m planning it as a primary desktop system for my home lab, I want to eventually migrate workflows from MacBook Pro to the new PC – and this means I want to use my existging LG 5K UltraFine 27” display. This seemed like an interesting Unix Tutorial Project from the very start!
Apparently, Debian installer doesn’t install or activate sudo by default. This means that sudo command is not found the only privilege escalation method available is becoming root via su command. Since I like and use sudo daily, I decided to install and setup it on Debian VM.
I’m slowly improving my Python skills, mostly by Googling and combining multiple answers to code a solution to my systems administration tasks. Today I decided to write a simpe converter that takes Epoch Time as a parameter and returns you the time and date it corresponds to.
I had a server run out of space recently, to the point that it couldn’t complete the yum update. This server ended up corrupting a yum packages database.
Now and then you may notice that apt-get upgrade command keeps a few packages back, meaning they don’t get upgraded. This quick post shows what you can do about it and how to get all the packages upgraded.
Unlike chmod command, chown only becomes useful if run with elevated (root) privileges. In Linux, it is most commonly used with the help of sudo command.
I know that the upcoming Linux Mint release will be based on the just-released Ubuntu 19.04, but just couldn’t wait this long to try Ubuntu 19.04 and all the improvements it brings. So my past few week’s project has been to install Ubuntu 19.04 on my Dell XPS 13 9380 laptop.
This week’s Unix Tutorial Project is super geeky and fun: I’m setting up text-based email archive system using Mutt (NeoMutt, actually), OfflineIMAP and hopefully NotMuch. Will publish a project summary on the weekend.
Call me old fashioned, but I still prefer using ifconfig command. It’s not as cool as the ip command found in recent Linux distros, but familiar and universal enough to be found pretty much everywhere else. This post shows how to install packages to make ifconfig working again.
I really like the Hack font – it’s used in my terminal apps on MacOS, Linux and even Windows workstations. This short post demonstrates how to install Hack font, but you can use the steps to configure any other TrueType Font (TTF) on your system.
One of the most useful and powerful basic Unix commands, chown command allows you to change ownership of specified files and directories – change user or group owner.
As you can imagine, SSH keypairs – combinations of private and public keys – are vital elements of your digital identity as a sysadmin or a developer. And since they can be used for accessing source code repositories and for deploying changes to production environments, you usually have more than one SSH key. That’s why it’s important to know how to inspect SSH key fingerprints.
Since awk field separator seems to be a rather popular search term on this blog, I’d like to expand on the topic of using awk delimiters (field separators).
I have a tiny server in home office, it used to be a Window 8 based entertainment box but I reinstalled it with Ubuntu 18.10 recently enough to run home automation. There has’t been any particular function assigned to this server but I have finally decided what role it will play: it will be an always-on Ubiquiti UniFi controller for my home office network!
diff is a mightly command line tool found in most of Unix and Unix-like operating systems. diff helps you to find differences between files and directories.
Now and then, especially when working on a development environment, you need to stop multiple Docker containers. Quite often, you need to stop all of the currently running containers. I’m going to show you one of the possible ways.
If for whatever reason you stop using a certain service in your Ubuntu install and would like to disable automatic restarting for it upon system reboot, all it takes to do it is just one command line.
Screen Shot 2019-01-05 at 17.29.36.png
dd command, that is pretty much guaranteed to be pre-installed on your Linux or Unix server, can be used to quickly get an understanding of the I/O capability of available storage.
You probably know about curl command: it’s great for downloading web pages or files from a Unix command line. But there’s another great usage curl command has: testing TCP ports connectivity.
One of the very first questions a Linux user asks is about confirming the release (OS version) in use. Knowing release helps with highlighting software dependencies and compatibilities, confirms availability of certain features in your OS and simplifies the process of system administration – certain releases have a preferred set of commands for day-to-day management.
New Linux users often get puzzled by the “mkdir: cannot create directory” errors when taking first steps and trying to learn basics of working with files and directories. In this short post I’ll show the two most common types of this mkdir error and also explain how to fix things so that you no longer get these errors.
IMPORTANT: This is a post from another blog of mine, which I’m shutting down. I like the way these virtualization concepts were worded in such a relatively simple way, so I’m keeping the post 🙂
Many of us have heard about hardware virtualization, but as far as I can see there is still a lot of confusion around this term and surrounding technologies, so today I’ve decided to give a really quick intro. Some time in the future, I’ll probably cover this topic in detail.
I explained how to read the /proc/mdstat in my recent post How To Identify RAID Arrays in Linux, so today is a super quick follow up using one of my systems.
Because I own a number of Raspberry Pi systems, I get roughly the same question quite regularly about each one of them: how can I confirm what this Raspberry Pi model is from the command line? The reason I usually want to know is because the model of the Raspberry Pi hints the Raspbian release that will support it (older Raspbian releases do not have support for the most recent models of Raspberry Pi).
When you want to save yourself from typing an unwieldy command over and over again you can create and use an alias for it. It will then act as a shortcut to the larger command, which you can type and run instead.
The tmux tool, or the terminal multiplexer, is great for allowing you to run multiple terminals side by side. What’s even better is that you can somewhat customize its behavior using the tmux.conf file. The meta key is the prefix you press before you issue a command that controls tmux so you can, for instance, split the terminal in two. By default it is set to CTRL-B, and this is how you can change that.
Some properties of ext2, ext3, and ext4 file systems on Linux and UNIX can be tuned on the fly using the tune2fs command. This includes the file system’s label.
The unrar program, which serves to open and extract popular .rar archives, is often available for install from repositories of a given Linux distribution. That should make installing it easy by using your distribution’s package management system. That can be either a graphical user interface program like Ubuntu Software Center, or a command like tool like apt-get.
Finding out sizes of files and directories in Linux is done using the du command, which estimates their disk space usage. The du command can be used with options that allow you to customize the results you get.
The visudo command is a safe and secure way of editing the /etc/sudoers file on UNIX and Linux systems. /etc/sudoers is instumental for gaining privileged access via sudo command.
The mkfs command available in UNIX and Linux operating systems is used to create file systems on various storage devices or partitions. It stands for “make filesystem”, and creating a file system is essentially an equivalent to what is popularly known as “formatting” a disk or a partition with a particular file system type (such as FAT32 or NTFS in Windows).
I had to download a piece of software today for one of the servers which I haven’t used in a while. A question of confirming the 64bit CPU capability came up, and I realized that I never mentioned it here on Unix Tutorial.
I’ve just been asked a question about changing the ownership of files from one Unix user to another, and thought it probably makes sense to have a quick post on it.
Yesterday in my post on numeric userids instead of usernames, I touched briefly the problem of recovering the username if you only know the userid it once had. Today I would like to show you another option which may be available to you when it comes to recovering the usernames of removed users by their userid.
As you know, every file in your Unix OS belongs to some user and some group. It is very easy to confirm the ownership of any file because user id and group id which own the file are always linked to the file. However, sometimes you can’t tell which user owns the file, and today I’m going to explain why. It’s a rather lengthy post and a complicated matter, so please leave questions or comments to help me polish this article off.
Today I’d like to show you the basic usage of rsync – a wonderful, old and reliable tool for incremental data transfers and synchronization of local directories or even data between different Unix systems.
If you’re interested in what exactly your Ubuntu system has got installed, there’s a command you can use to list the packages along with their versions and short descriptions.
If you’re logged in at some remote Linux system and need to quickly confirm the amount of available memory, there’s a few commands you will find quite useful.
Certain situations require you to quickly confirm which files between two directories are different, and while your particular requirements may suggest writing a script for this task, I want to make sure you’re familiar with the basics first – majority of directory comparisons can be done using diff command (yes, that’s right – the same one used for comparing files).
Showing your processes in a hierarchical list is very useful for confirming the relationship between every process running on your system. Today I’d like to show you how you can get tree-like processes lists using various commands.
As you know, Unix filesystems store a number of timestamps for each file. This means that you can use these timestamps to find out when any file or directory was last accessed (read from or written to), changed (file access permissions were changed) or modified (written to).
Another quick answer to the question I see a lot in search queries on this blog: listing directories in a directory. I take it that this question means showing a list of only the directories and not other files under a certain location of your Unix filesystem.
Very quick tip for you today, I just see that many of visitors of this block are curious how they can find a directory in Unix – and so here’s a command to help you do just that.
When you’re trying to clean up your filesystems and reclaim some space, one of the first things you’ll want to do is to confirm the largest directories and individual files you have. This can be easily done using two Unix commands: find command and du command.
To some this may seem like a trivial task, but I see great interest from Unix/Linux beginners arriving to this blog: how exactly does one confirm what a symlink points to?
atime, ctime and mtime in Unix filesystems
As you know, Unix filesystems store a number of timestamps for each file. This means that you can use these timestamps to find out when any file or directory was last accessed (read from or written to), changed (file access permissions were changed) or modified (written to).
File and directory timestamps in Unix
Three times tracked for each file in Unix are these:
access time – atime
change time – ctime
modify time – mtime
INTERESTING: there’s no file creation timestamp kept in most filesystems – meaning you can’t run a command like “show me all files created on certain date”. This said, it’s usually possible to deduce the same from ctime and mtime (if they match – this probably means that’s when the file was created).
atime – Last Access Time
Access time shows the last time the data from a file or directory was accessed – read by one of the Unix processes directly or through commands and scripts.
Due to its definition, atime attribute must be updated – meaning written to a disk – every time a Unix file is accessed, even if it was just a read operation. Under extreme loads, atime requirement could severely impact the filesystem performance, especfially with hard disks (HDDs) compared to Solid State Disks (SSDs).
Modern Unix and Unix like operating systems have special mount options to optimise atime usage (or disable it completely).
For instance, in Linux kernel the following atime optimisations are supported when mounting filesystem:
strictatime – always update atime (no longer the default!)
relatime (“relative atime”) – selective atime updates, usually if previous - atime is an older timestamp than ctime and mtime (see below)
nodiratime – no access time updates for directories (files still get atime updates)
noatime – no access time updates for anything
ctime – Last Change Time
ctime shows when your file or directory got metadata changes – typically that’s file ownership (username and/or group) and access permissions. ctime will also get updated if the file contents got changed.
mtime – Last Modification Time
Last modification time shows time of the last change to file’s contents. It does not change with owner or permission changes, and is therefore used for tracking the actual changes to data of the file itself.
INTERESTING: When a new file or directory is created, usually all three times – atime, ctime and mtime – are configured to capture the current time.
How to Use atime, ctime and mtime
Lots of common system administration tasks can be helped, if not completed, using knowledge of atime, ctime and mtime attributed:
find files updated on a certain date
confirm when was the last time a configuration file was changed
find files modified in the last hour or day – very useful for finding most recently updated log files
verify if a certain file was accessed and when – useful when debugging a script
quickly get the list of really old files (not updated for longer than 30 days or something like that)
confirm when the directory was updated – can suggest that temporary files were created and quickly deleted, so you don’t see the files but recognise evidence when they were still in the directory
review a list of files to confirm when they had ownership (user/group) data updated and if this time is different from file modifications – could be useful when reviewing security breach on your Unix system
Find atime, ctime and mtime with ls
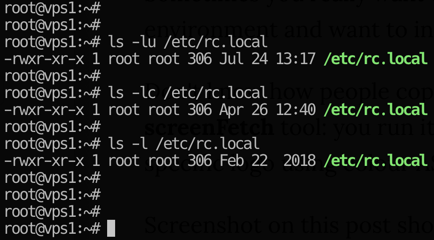
The simplest way to confirm the times associated with a file is to use ls command. Timestamps are shown when using the long-format output of ls command, ls -l:
ls -l, which shows you the time of the last file modification – mtime. In our example, file /tmp/file1 was last changed around 7:10am. If we want to see the last access time for this file, atime – you need to use -lu options for ls. The output will probably show some later time:
To show you how this works, I’ll change the ownership of the file and then run the same 3 ls commands to show you that only the ctime had been updated. I run the date command just before doing anything else so that you can compare the times:
ubuntu# date Sat Apr 5 07:35:16 IST 2008
ubuntu# chown root /tmp/file1
ubuntu# ls -lc /tmp/file1
-rw-r--r-- 1 root root 9 2008-04-05 07:35 /tmp/file1
ubuntu# ls -lu /tmp/file1
-rw-r--r-- 1 root root 9 2008-04-05 07:27 /tmp/file1
ubuntu# ls -l /tmp/file1
-rw-r--r-- 1 root root 9 2008-04-05 07:10 /tmp/file1
Show atime, ctime and mtime with stat command
In Linux distributions, you will probably find a stat command, which can be used to show all of the times in a more convenient way, and among plenty of other useful information about your file:
Follow me on Facebook and Twitter or jump into Telegram chat!:
Recommended Software
I use Brave browser, it's awesome:
I'm also a fan of SetApp for macOS:
IT Consultancy
I'm a principal consultant with Tech Stack Solutions. I help with cloud architectrure, AWS deployments and automated management of Unix/Linux infrastructure. Get in touch!